

In this tutorial we will learn about How to add App Intro Slider in React Native App. App Intro slider is a collection of sliding images. App Intro Slider contains a number of images which we can slide through.
We can use App Intro Slider for giving introduction about our App. App Intro Slider is a great way for giving introduction about functionality of our App.
In this tutorial, i have used react-native-app-intro-slider npm library for adding App Intro Slider in React Native App. This is great library. Using this library, we can customize button icons, background color, title text, description text etc. This library provides a rich set of tools for doing all this. So lets get started.
Steps To Add App Intro Slider In React Native App
1.Installing react-native-app-intro-slider library
First of all , we need to install react-native-app-intro-slider library. You can use either npm or yarn to install this library. I have used npm here. So use the following code to install react-native-app-intro-slider from the command prompt in your projects directory. Make sure you are inside your project directory.
npm install react-native-app-intro-slider --save
This will install react-native-app-intro-slider in your project.
2. Importing react-native-app-intro-slider into your App.js
In this step, we need to import the package into our App.js file. So use the following code in your App.js file to import the library.
import AppIntroSlider from 'react-native-app-intro-slider';
Now, all the methods and tools of react-native-app-intro-slider can be accessed by AppIntroSlider in our App.js file.
3. Creating a state showApp to handle Intro Slider Visibility Status
In this step, we need to create a state showApp for controlling visibility of App Intro Slider in our App. We can use this state variable to check whether to show App Intro Slider or Main App. We can initialize this state variable in constructor. So you can use following code to initialize this state variable:
constructor(props) {
    super(props);
    this.state = {
        //ignore this spinValue state variable, it is for main app code
        spinValue: new Animated.Value(0),
        showApp: 'false'
      };
  }
If showApp state variable is true, we will display Our main App, if it is false, we will display App Intro Slider.
4. Handling slider state Visibility using Functions
In this step, we will create two functions named on_Done_slides and on_Skip_slides for controlling state variable. We will set showApp variable to true once user either skip slides or done all slides. So that next time we can show Our Main App. But for that we also need to save first_time variable in persistent AsyncStorage , which will be used to control every time to check whether App is being used first time or not, if app is being used first time, we will show App Intro Slider. So by this way, we will update our showApp variable to the vaue we will fetch from first_time AsyncStorage. For this we will create two more functions for setting AsyncStorage variable and getting that variable named getFirstTime() and setFirstTime().
Note: if we do not use AsyncStorage, then showMain app will be set equal to false every time in constructor, so it will show App Intro Slider every time user will open App again. So for controlling that scenario, we will use AsyncStorage variable named first_time that will get updated after user have gone through Slider, So next time App Intro Slider would not be shown to user.
For using AsyncStorage, we need to install @react-native-community/async-storage npm package. This is the latest library that is being used for AsyncStorage. So First install @react-native-community/async-storage using npm as given below:
npm install @react-native-community/async-storage --save
Then import AsyncStorage into you project as given below:
import AsyncStorage from '@react-native-community/async-storage';
So all the four functions are given below:
async getFirstTime() {
    try {
      const value = await AsyncStorage.getItem('@first_time');
      if(value !== null) {
        // value previously stored
        this.setState({ showApp: value});
      }else{
        this.setState({ showApp: 'false'});
      }
    } catch(e) {
      // error reading value
    }
  }

  async setFirstTime() {
    try {
      await AsyncStorage.setItem('@first_time','true').then(()=>{
        this.setState({ showApp: 'true'});
      });

    } catch(e) {
       // error reading value
      console.log(e);
    }
  }

 on_Done_slides = () => {

    this.setFirstTime();

  };

  on_Skip_slides = () => {

    this.setFirstTime();

  };
And call setFirstTime() in both on_Done_slides and on_Skip_slides methods for updating showApp state variable and first_time AsyncStorage variable.
And also call getFirstTime() in constructor for initializing showApp on the basis of AsyncStorage variable first_time. So the constructor will now look like as given below:
constructor(props) {
    super(props);
    this.state = {
        //ignore this spinValue state variable, it is for main app code
        spinValue: new Animated.Value(0),
        showApp: 'false'
      };
    this.getFirstitem();
  }
5. Setting up slides Data And Stylesheet
In this step , we need to set slides data and stylesheet. So use the following code to set slides array.
const slides = [
  {
  key: 'k1',
  title: 'Intro Screen1',
  text: 'Screen1 Text',
  image: {
    uri:
      'https://codingambitions.com/test/images/test_alarm2.png',
  },
  titleStyle: styles.title,
  textStyle: styles.text,
  imageStyle: styles.image,
  backgroundColor: '#FF1744',
},
{
  key: 'k2',
  title: 'Intro Screen2',
  text: 'Intro Screen2 Text',
  image: {
    uri:
      'https://codingambitions.com/test/images/test_calender.jpg',
  },
  titleStyle: styles.title,
  textStyle: styles.text,
  imageStyle: styles.image,
  backgroundColor: '#D500F9',
},
{
  key: 'k3',
  title: 'Intro Screen3',
  text: 'Intro Screen3 Text',
  image: {
    uri: 'https://codingambitions.com/test/images/test_alarm.png',
  },
  titleStyle: styles.title,
  textStyle: styles.text,
  imageStyle: styles.image,
  backgroundColor: '#2979FF',
},

];
And use following code for creating stylesheet for slides:
const styles = StyleSheet.create({

  MainContainer: {
    flex: 1,
    paddingTop: (Platform.OS) === 'ios' ? 20 : 0,
    alignItems: 'center',
    justifyContent: 'center',
    padding: 20
  },
  title: {
    fontSize: 26,
    color: '#fff',
    fontWeight: 'bold',
    textAlign: 'center',
    marginTop: 20,
  },
  text: {
    color: '#fff',
    fontSize: 20,
  },
  image: {
    width: 200,
    height: 200,
    resizeMode: 'contain'
  }
}
);
6. Setting up a condition to show Either Main App or App Intro Slider
In this step, we make use of our state variable showApp for setting a condition to make either the main app or App Intro Slider visibile in our App.
So for that, we will change the render() function with if else condition of showApp state variable. If showApp is true, we will return view for Our Main App else we will return App Intro Slider from render() function. So use the following code in render function:
render() {
    if (this.state.showApp=='false') {
      const spin = this.state.spinValue.interpolate({
        inputRange: [0, 1],
        outputRange: ['0deg', '360deg']
      });

      //return main app here
      return (
        <View style={styles.container}>
          <Animated.Image source={logo} style={[styles.logo, { transform: [{rotate: spin}] }]}/>
          <Text style={styles.title}>Create React Native Web App</Text>
          {Platform.OS !== 'web' && <Text>Shake your phone to open the developer menu.</Text>}
          <TouchableHighlight
            onPress={this.onClick}
            style={styles.button}
            underlayColor={'#0A84D0'}
          >
            <Text style={styles.buttonText}>Rotate Logo</Text>
          </TouchableHighlight>
        </View>
      );
    } else {
      //return app intro slider here
      return (
      <AppIntroSlider
          slides={slides}
          onDone={this.on_Done_slides}
          showSkipButton={true}
          onSkip={this.on_Skip_slides}
        />
      );
    }
  }
In the else condition, you can see <AppIntroSlider/> tag with the options set for slides={slides}, onDone={this.on_Done_slides}, showSkipButton={true} and onSkip={this.on_Skip_slides}. So here it is being initialized with initial data that will be displayed.
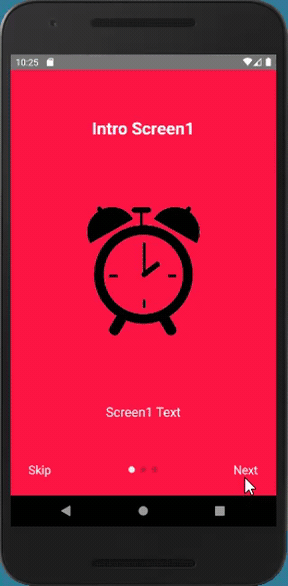
So if you will run your app now, intro slider will load as given below:
Complete Source code of the App.js is given below:
import React, { Component } from 'react';
import {
  StyleSheet,
  Text,
  View,
  Platform,
  TouchableHighlight,
  Animated,
  Easing,
} from 'react-native';

import logo from './logo.png';
import AppIntroSlider from 'react-native-app-intro-slider';
import AsyncStorage from '@react-native-community/async-storage';

export default class App extends Component {

  constructor(props) {
    super(props);
    this.state = {
      spinValue: new Animated.Value(0),
      showApp: 'false'
      //To show the main page of the app
    };

    this.getFirstTime();

  }


  async getFirstTime() {
    try {
      const value = await AsyncStorage.getItem('@first_time');
      if(value !== null) {
        // value previously stored
        this.setState({ showApp: value});
      }else{
        this.setState({ showApp: 'false'});
      }
    } catch(e) {
      // error reading value
    }
  }

  async setFirstTime() {
    try {
      await AsyncStorage.setItem('@first_time','true').then(()=>{
        console.log("here");
        this.setState({ showApp: 'true'});
        this.props.navigation.navigate('Home');
      });

    } catch(e) {
       // error reading value
      console.log(e);
    }
  }


  on_Done_slides = () => {

    this.setFirstTime();

  };

  on_Skip_slides = () => {

    this.setFirstTime();

  };

  onClick = () => {
    const wasRotated = this.state.spinValue._value === 1;
    Animated.timing(
      this.state.spinValue,
      {
        toValue: wasRotated ? 0 : 1,
        duration: 250,
        easing: Easing.linear
      }
    ).start()
  }

  _renderItem = (item) => {
    return (
      <View style={styles.slide}>
        <Text style={styles.title}>{item.title}</Text>
        <Image source={item.image} />
        <Text style={style.text}>{item.text}</Text>
      </View>
    );
  }

  render() {
    if (this.state.showApp=='true') {
      const spin = this.state.spinValue.interpolate({
        inputRange: [0, 1],
        outputRange: ['0deg', '360deg']
      });

      //return main app here
      return (
        <View style={styles.container}>
          <Animated.Image source={logo} style={[styles.logo, { transform: [{rotate: spin}] }]}/>
          <Text style={styles.title}>Create React Native Web App</Text>
          {Platform.OS !== 'web' && <Text>Shake your phone to open the developer menu.</Text>}
          <TouchableHighlight
            onPress={this.onClick}
            style={styles.button}
            underlayColor={'#0A84D0'}
          >
            <Text style={styles.buttonText}>Rotate Logo</Text>
          </TouchableHighlight>
        </View>
      );
    } else {
      //return app intro slider here
      return (
      <AppIntroSlider
          slides={slides}
          onDone={this.on_Done_slides}
          showSkipButton={true}
          onSkip={this.on_Skip_slides}
        />
      );
    }
  }
}

const styles = StyleSheet.create({
  container: {
    flex: 1,
    backgroundColor: '#fff',
    alignItems: 'center',
    justifyContent: 'center',
  },
  logo: {
    width: 300,
    height: 300,
  },

  button: {
    borderRadius: 3,
    paddingHorizontal: 20,
    paddingVertical: 16,
    marginVertical: 5,
    marginTop: 10,
    backgroundColor: '#1B95E0',
    borderRadius:10,
    borderWidth: 1,
    borderColor: '#fff'
  },
  buttonText: {
    color: '#fff',
    fontWeight: 'bold',
    fontSize: 16,
  },


MainContainer: {
  flex: 1,
  paddingTop: (Platform.OS) === 'ios' ? 20 : 0,
  alignItems: 'center',
  justifyContent: 'center',
  padding: 20
},
title: {
  fontSize: 26,
  color: '#fff',
  fontWeight: 'bold',
  textAlign: 'center',
  marginTop: 20,
},
text: {
  color: '#fff',
  fontSize: 20,
},
image: {
  width: 200,
  height: 200,
  resizeMode: 'contain'
}

});


const slides = [
  {
  key: 'k1',
  title: 'Intro Screen1',
  text: 'Screen1 Text',
  image: {
    uri:
      'https://codingambitions.com/test/images/test_alarm2.png',
  },
  titleStyle: styles.title,
  textStyle: styles.text,
  imageStyle: styles.image,
  backgroundColor: '#FF1744',
},
{
  key: 'k2',
  title: 'Intro Screen2',
  text: 'Intro Screen2 Text',
  image: {
    uri:
      'https://codingambitions.com/test/images/test_calender.jpg',
  },
  titleStyle: styles.title,
  textStyle: styles.text,
  imageStyle: styles.image,
  backgroundColor: '#D500F9',
},
{
  key: 'k3',
  title: 'Intro Screen3',
  text: 'Intro Screen3 Text',
  image: {
    uri: 'https://codingambitions.com/test/images/test_alarm.png',
  },
  titleStyle: styles.title,
  textStyle: styles.text,
  imageStyle: styles.image,
  backgroundColor: '#2979FF',
},

];
I hope you have understood about how to add App Intro Slider in React Native App. If you face any problem implementing App Intro Slider , you can leave your comments.
Thanks!