[vc_row][vc_column]
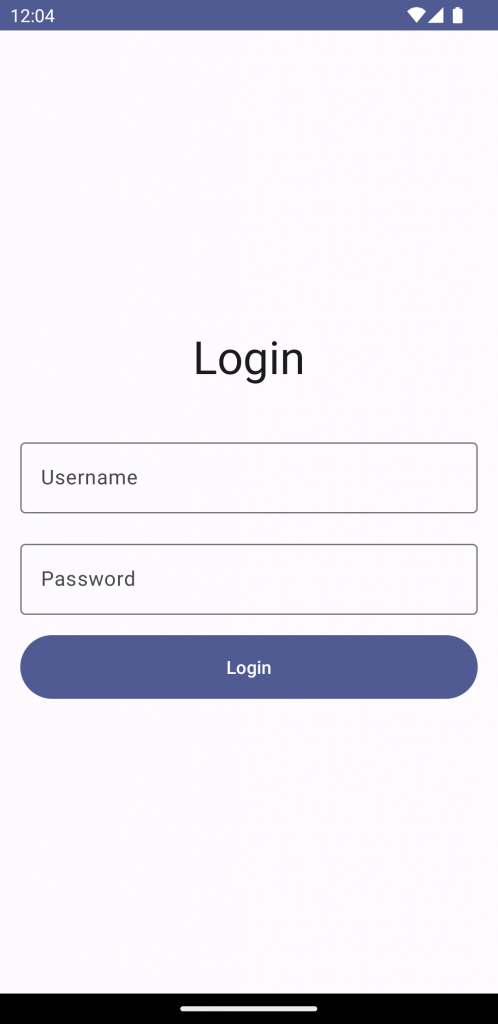
Hi, In this article we will create our first app in jetpack compose with a login screen example. If you want to learn about what is jetpack compose, you can checkout my another article on it on the below given link. What is Jetpack compose? Should we use it? By the end of the article you will be able to build a screen like this So now lets continue with our app. Following steps are needed to create your first app with login screen example in jetpack compose Create new Project from Android studio with Empty Activity option with compose logo. It will automatically add compose related required dependencies and settings. After Android Studio finished creating the project. Then you will find some code in Now add following code there, We will add a Now lets add login heading, username and password fields in the column, Add the following code inside Column. If you have noticed, First we added Simple Text composable with material style as And then added And then we added 2 And finally lets add submit button below those composables And now if you will run this app and try to type the text in username and password fields, you will notice that it will not update that. Because in value field we have used So add the following code there in the beginning of If you noticed So add following code in And in username And now if you will try to run this app, it will update the username and password fields. And its done, Finally you have created your first app in Jetpack Compose. ComposeTutorial2CreateYourFirstApp Thats all for now. Thanks for spending your valuable time reading this article. You can connect with me on: Keep coding. Hi, in this blog, we will learn about what is jetpack compose in Android and should we use it? So lets start with that. What is Jetpack Compose?… Hi, Are you also going through the stage when we pass out the degree but don’t have a job due to lack of experience. Well don’t worry then… In this tutorial, We will learn about How To Share Text In Android Using Intents. But before we learn about that, let me give short introduction about intents… Hi, In this article we will create our first app in jetpack compose with a login screen example. If you want to learn about what is jetpack compose,…
Creating Your First App in Jetpack Compose
Step 1
setContent method in MainActivity.kt, you can remove that code, because we will add code for login screen there.Step 2
Column there because we want layout items to be arranged vertically, one below another. And also we want to align them vertically in the center, for that we have used verticalArrangement = Arrangement.Center and similarily for placing the content in center horizontally, we have used horizontalAlignment = Alignment.CenterHorizontally.Surface(
modifier = Modifier.fillMaxSize(),
color = MaterialTheme.colorScheme.background
) {
Column(
modifier = Modifier
.fillMaxWidth()
.padding(horizontal = 16.dp),
verticalArrangement = Arrangement.Center,
horizontalAlignment = Alignment.CenterHorizontally
) {
}
}
Step 3
Text(text = "Login", style = MaterialTheme.typography.displaySmall)
Spacer(modifier = Modifier.height(36.dp))

OutlinedTextField(
    modifier = Modifier.fillMaxWidth(),
    value = "", onValueChange = {},
    label = { Text(text = "Username") },
    visualTransformation = VisualTransformation.None
)
Spacer(modifier = Modifier.height(16.dp))

OutlinedTextField(
    modifier = Modifier.fillMaxWidth(),
    value = "", onValueChange = {},
    label = { Text(text = "Password") },
    visualTransformation = PasswordVisualTransformation(),
)
Spacer(modifier = Modifier.height(16.dp))
MaterialTheme.typography.displaySmallSpacer for space, it will add 36.dp space below that heading.OutlinedTextField composables there for taking input as username and password. And if you noticed visualTransformation = PasswordVisualTransformation(), it will show password input character as dots. And then again a Spacer.Step 4
Button(
    modifier = Modifier
               .fillMaxWidth()
               .height(50.dp), onClick = { /*TODO*/ }) {
    Text(text = "Login")
}
"" empty string and by default Jetpack Compose will not remember its state if we update it. So we need to remember that text as state which we will be saving using remember composable which allows us to remember the state till that composable’s lifecycle. And then on onValueChange, we need to update that remember composable state value. We can use mutableStateOf method for creating state in jetpack compose.Column.val username = remember {
mutableStateOf(TextFieldValue())
}
val password = remember {
mutableStateOf(TextFieldValue())
}
TextFieldValue() which is the type of value we are saving. And also we need to use this value from remember now in value field of both OutlinedTextField‘s. And also we need to update this state on onValueChange every time text will be changed. onValueChange of username OutlinedTextField username.value = it OutlinedTextField. password.value = itGithub Source Code Link:-


